Rhinestones add extra sparkle and flare to your manicure. They come in all different sizes, shapes, and colors, so you can really get creative with your designs. But you might have lots of questions about how to apply gems to your nails.
For example, how do you get rhinestones to stick to your nails? Can you use nail glue? Do you put a top coat over them?
Let’s talk about how to apply rhinestones to nails in 3 steps.
The first section covers adding rhinestones without glue using polish only.
Scroll down to see how to apply rhinestones with gem gel, gel adhesive, or nail glue.
How to Apply Rhinestones to Nail Lacquer or Gels Without Adhesive
We’ll begin with directions for applying rhinestones to nail lacquer or gel nails without adhesive.
This is the least secure method for adhering rhinestones and is best suited to small gems only. However, it’s ideal if you don’t have nail glue handy or only want the nail art to last for a day.
Prepare the Nails
Begin by preparing the nails in the usual manner you would for any manicure.
Push back cuticles and shape the nail. Buff the surface to dull the shine. Remove debris and apply a base coat and cure it (gel) or let it air dry (lacquer). Then add the colored polish if desired and cure it.
Cleanse the surface with a lint-free wipe (if you’re using gel polish and it’s required) before attaching the rhinestones.
Apply Top Coat (Part 1)
Brush on the top coat and press the rhinestones into place before the top coat dries (lacquer) or before you cure it (gel). Try to avoid sliding the gems or smudging the surface.
If you’re using nail lacquer that air dries, you’ll have to work fast.
Let the nail dry or cure the top coat.
Apply Top Coat (Part 2)
Now, use a thin nail art brush to carefully dab the top coat around the base of the rhinestones. Let that dry or cure it.
Don’t brush the top coat over the rhinestones. It will make them look dull.
If you’re using a nail lamp to cure gel polish, rock the hand gently and slowly from side to side to make sure the light reaches into all the crevices and cures the gel completely.
Pro tip: an aerosol drying spray speeds the process and makes sure the polish cures completely.
How to Pick up Rhinestones
Professionals use a wax–tipped pen to pick up rhinestones because they are easy and accurate. The wax tips can be sharpened and replaced when needed.
However, you can also use a crayon, needle-nose tweezers, a dampened orange stick, or even a piece of wet spaghetti (uncooked). These DIY tools may not provide the best results as they don’t have the same level of control. It’s really worth it to spend a couple of bucks on the right tool.
The Best Placement for Rhinestones
It’s not about art but function. A gem design will be more stable if you place large stones close to the cuticle because the nail doesn’t flex there. Nevertheless, leave a small gap so that you can seal around the stones without painting over the skin.
How to Use Gel Adhesive to Apply Rhinestones in 3 Steps
If you use builder gel or gel adhesive like gem gel to stick on rhinestones, it will hold even the largest stones. Moreover, it can be soaked off so that the gems can be reused.
Prepare the Nail
Prep and shape the nails. Put on two coats of polish and cure each layer. Then use a wipe to remove the tackiness if needed.
Lightly buff the area where you’ll apply the gems.
Apply Adhesive
Put a dab of gel adhesive in the spot you buffed. Then place the rhinestones where you want them.
Now, cure the adhesive under the nail lamp. Rock the hand gently from side to side to make sure the light dries everything.
Pro tip: an aerosol drying spray is helpful.
Secure the Rhinestones
Although you could stop after curing the adhesive, you can make the nail art more secure by dabbing a tiny amount of gem gel or resin around the base of each gem and curing again.
How to Get the Adhesive in the Right Place?
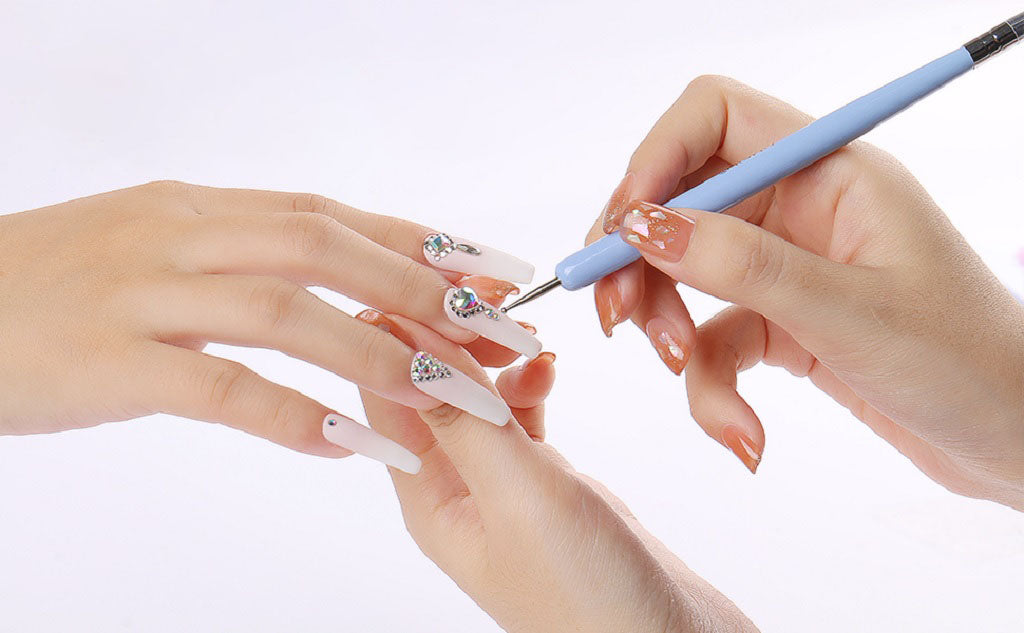
Big blobs of glue are unsightly. That’s why dot picker pens are handy for doing nail art with rhinestones. They are perfect for precision placement.
Use the narrow metal point to pick up and dab on a small amount of nail glue, builder gel, or gem gel.
Can You Use Nail Glue to Apply Rhinestones to Natural Nails?
Yes, you can use nail glue to stick on rhinestones. Nail glue is used for press-on nails. It can be harsh on the natural nail. Therefore, it’s best to apply polish as a protective layer. It makes removing the rhinestones much easier.
Don’t Do These Things with Rhinestones
Please don't use super glue to attach rhinestones! It's bad for your skin and nails.
Don’t apply polish or adhesive on top of the gems because it will make them lose their sparkle.
What Kind of Rhinestones Are Best for Nail Art?
There are all sorts of gorgeous rhinestones available in various colors, shapes, and sizes.
If you want to use large rhinestones, we suggest looking for ones with a curved back to hug the nail.
Acrylic gems are inexpensive and colorful. Meanwhile, glass stones and crystals tend to be even more sparkly than acrylic ones.
How to Make Rhinestones Look Even More Amazing
If you use glitter nail polish underneath, transparent rhinestones will look downright stunning.
Also, using a matte finish top coat creates a contrast that makes the gems stand out even more.
Can You Apply Rhinestones on Dip Powder Nails?
This brief video will show you how to apply rhinestones on a dip powder manicure. It may spark your imagination with ideas for placement, too.
Conclusion
With a little practice, you’ll be a nail art pro! These tips about how to apply rhinestones to nails will get you started today. Click the links above and visit our store to find all the supplies you need.


